Monday, December 30, 2013

This One Time, I Did a 5k!

If you would have asked me this time last year if I'd EVER do a 5k (or any kind of "race") I would have probably laughed in your face. I couldn't imagine ever paying to run (or walk or whatever). And, this time last year I couldn't imagine walking for any significant amount of time. If I only knew!

A few months back, when I was searching for the number to my USC doctor, I came across a banner for the 5k/10k Quench the Fire Walk/Run/Roll on the USC Pain Center website. WHAT?!? A 5k for my syndrome?! Sweet! I was in. I gathered up some friends, registered, and got my walk on.

On December 7th, we tried (though there was a NASTY storm) to head down south to Van Nuys. Much to our dismay, the Grapevine was closed, so we had to drive ALL. THE. WAY. AROUND. It took FOREVER (and by forever I mean about 6 and 1/2 hours!). At least we got to see the ocean…


Sunday, the day of the race, was FREEZING! Well, just about freezing… I believe it was 34 degrees that morning as we headed out to the race. We bundled all up and wandered around the booths before the race began. 

Here we are with some LA Kings dudes!


Here's our team: CRPS Crushers!


Can you guess which one is me? Yes, I had to walk the 5k in flip-flops. The fire feet would certainly not tolerate being covered for 3.1 miles. They warmed up quite well quite quickly!


Check out the race route! It was BEAUTIFUL! 


Manda and me finishing the race! We walked 3.1 miles in under 43 minutes (barely). Not bad. Aaaand, we didn't even come in last! :)


After the race, we wandered around a bit and waited for some raffle drawings. Here is the CRPS quilt that has been all over the country!


MacGyver was the MC of the race! We went to get his autograph afterward and I learned that we have the same doctor! We had a nice little chat about our doc and pain issues. Poor dude couldn't even walk the mile this year. He was impressed that I did the 5k in flip flops. Haha. I told him I'd walk the 5k with him next year. We had a moment. ;)


After wrapping things up at the race and packing things up back at the hotel, we headed home. It was quite a SHORT trip compared to our journey down, AND we had this amazing view for much of the way. No wonder the Grapevine has closed the day before!


I certainly had a blast at the race (and the entire weekend). I can't wait until next year. Perhaps I'll even be able to wear shoes!

Who's in?!?


If you're curious about RSD/CRPS, click here!

Christmas Craftiness

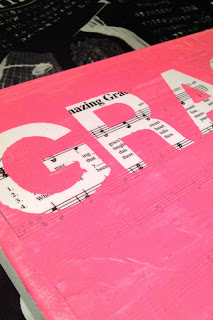
Each Christmas I like to make a special present for my cousins' kids. I pretty much adore them, so I enjoy showing them love in this way. This year, I went for the canvas/name craft. It's similar to this canvas I made for my cousin for her birthday, but I added my own background this time.


How to:

Take an 8x10 canvas (or any size you'd like).
Apply a thin layer of Mod Podge.
Place sheet music or Bible pages (or whatever other page you'd like) onto the canvas and smooth it out (it won't get completely smooth).
Apply another layer of Mod Podge onto the top of the page.
Let it dry COMPLETELY.
Once it's dry, take adhesive letters and set them onto the canvas to figure out correct placement (for the shorter names, I used 3" letters, but for the longer names I had to use 1" letters, and I did their first and middle names).
Apply the letters to the canvas.
Paint over the entire thing with whatever color you'd like.
Let it dry (but don't keep the letters on longer than necessary).
Carefully peel the letters off.
Apply yet another layer of Mod Podge to the entire canvas.
Enjoy!

I made nine of them, but here are a few close-ups:


Here they all are!


And here are a couple of pictures of the kiddos opening them on Christmas Eve Eve.


Friday, December 27, 2013

Mary's Magnificent God

My uncle asked me to read Mary's Magnificat and share a few thoughts at his house church's Christmas Eve service this year. Since this service is one of my absolute favorite parts of Christmas, I gladly agreed. I couldn't quite form my thoughts into a cohesive paragraph or two, so as I sat with my pencil and notebook, a poem sort of just popped out. Here is what I shared:


Mary, most ordinary in name
Desiring only and always God's fame
Her nature so lowly and meek
Identity only in God did she seek
A servant so humble and mild
Yet herself just older than a child
When news of a son was brought
Trust and obedience Mary sought
Through the Spirit she'd conceive a baby boy
"Let it be to me," she said with joy
To ensure God's praises would always ring
The Magnificat to our Lord did she sing:

Luke 1:46-55

My soul magnifies the Lord,
and my spirit rejoices in God my Savior,
for he has looked on the humble estate of his servant.
For behold, from now on all generations will call me blessed;
for he who is mighty has done great things for me,
and holy is his name.
And his mercy is for those who fear him
from generation to generation.
He has shown strength with his arm; 
he has scattered the proud in the thoughts of their hearts;
he has brought down the mighty from their thrones
and exalted those of humble estate;
he has filled the hungry with good things,
and the rich he sent empty away.
He has helped his servant Israel,
in remembrance of his mercy,
as he spoke to our fathers,
to Abraham and to his offspring forever.

In the words of John Piper...

"The only people whose soul can truly magnify the Lord are people like...Mary--people who acknowledge their lowly estate and are overwhelmed by the condescension of the magnificent God."

Tuesday, December 17, 2013

Craftiness Strikes Again!

I've seen this idea on Pinterest a time or two, but I decided to take it and run with it. I absolutely love giving gifts, and I wanted to make something special for my cousin for her birthday, so I was quite excited to tackle this particular project.

Take a look!

Step 1: Find an awesome picture at Goodwill or another thrift store (preferably one with a neat frame). This one is a canvas.

Step 2: Tape off the frame to prevent paint from bleeding onto it.


Step 3: Get some good adhesive letters of the appropriate size to match your picture and saying.


Step 4: Cut closely around the letters and set them (don't stick them yet!) on the picture to get an idea of correct placement.


Step 5: Peel the back off of the letters and attach them (well!) to the picture.


Step 6: Paint over the entire picture with your desired color (sorry, I didn't take a picture of that step!).

Step 7: Let it dry (just enough!) to the touch (you don't want your letters on there longer than necessary).

Step 8: Peel off the letters!


I LOVE how it turned out! What do you think??